|
The Fireworks interface is set up to make accessing the tools quick and intuitive. When you start Fireworks, you'll notice that it doesn't create a new document automatically — instead, you see something the Start Page. From the Start Page, where you get one-click access to:
- Open a Recent Item: Just click the filename, or click the Open folder and browse to a file to open the image in Fireworks.
- Create New: Click the Fireworks File link to open a new, blank image.
- Extend: Click the Fireworks Exchange link to browse to a part of the Macromedia Web site that includes lots of free, downloadable cool tools and graphical elements created by users.
- Tutorials: Click the Take a Quick Tour of Fireworks link or the Take a Fireworks Tutorial link to go through a tutorial.
If you don't want the Start Page to show up every time you launch Fireworks, click the Don't Show Again check box at the bottom-left corner of the page.
To create a new Fireworks file (native file type .PNG ), just follow these steps:
1. Choose File --> New, or click the Fireworks File link on the Start Page.
The New Document dialog box appears.
2. Choose the canvas size for your document.
The default width and height are 500 pixels, and the default resolution is 72 pixels per inch. You can enter your own size in the fields provided and change the unit of measurement by selecting one from the drop-down list. You should leave the resolution at 72 pixels per inch unless you're designing for some medium other than the Web, like print.
If you have something on the clipboard eg you have got something copied in memory fireworks will give you dimensions for the canvas the correct size
3. Select a colour for the canvas.
The default canvas colour is white, but you can choose a custom colour by selecting the Custom radio button and then using the eyedropper to choose a colour from the colour picker. You can also choose to have a transparent background by selecting the Transparent radio button.
4. Click OK to create your new Fireworks document.
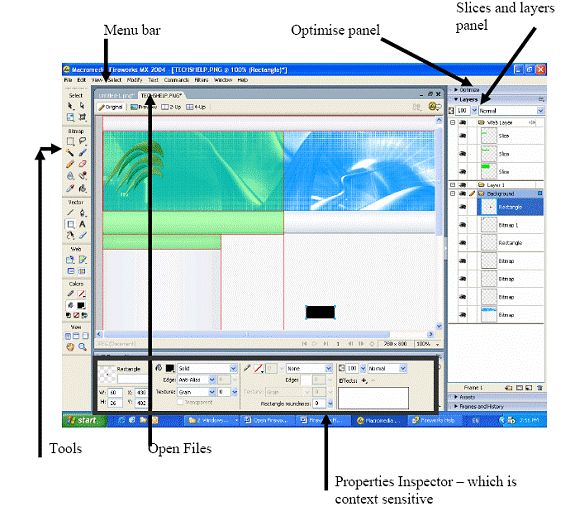
Fireworks interface

When something is selected in Fireworks it has a blue line around it. As you move the mouse over different objects on your canvas a red line appears around them to indicate where the object begins and ends.
The Tools panel:
The panels lined along the left side of the screen are parts of the Tools panel, which provides access to all the tools you use to make and modify your graphics. The Tools panel divides tools into groups based on their function, as described in the following list:
- Select: Contains tools used to select an object, as well as tools used to crop or otherwise manipulate the canvas.
- Bitmap: Stores tools used to paint, draw, fill, and so on.
- Vector: Contains tools used to create and manipulate vector graphics.
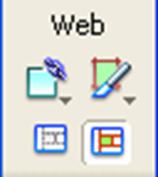
- Web: Holds tools, such as the Slice tool, that are designed specifically for getting images ready for the Web.
- Colours: controls the colour of objects.
An arrow at the lower-right corner of a tool's icon indicates that the tool has one or more specialized variations. You can click the arrow to activate a pop-up menu that displays icons for the available variations.
The Tools
 |
Select:
The following four tools make up the Select section of the Tools panel:
• Pointer/Select tool: Use the Pointer tool to select objects on the canvas by clicking on them or clicking and dragging an area that encompasses them.
• Subselection tool: Use the Subselection tool to select an individual object from a group.
• Crop Area tool: Click the Crop tool and click-and-drag to select an area on the canvas to crop an image. When you crop an image, you discard everything outside the selected area from your image.
• Scale/Skew/Distort tool: This tool is inactive (as indicated by the dimmed icon) until you have selected an object on the canvas. Click this tool and click and drag the transform handles at the corners of the object to change its size and/or shape. |
 |
Bitmap:
The following ten tools make up the Bitmap section of the Tools panel:
• Marquee/Oval Marquee tool: Click the Marquee tool and click and drag to select a rectangular area on the canvas. If you want to select a circle or oval area, use the Oval Marquee variation
Lasso/Polygon Lasso tool: Click the Lasso tool and click and drag on the canvas to select everything within an irregularly shaped area of the canvas. If the shape you want to select is made up of straight lines, use the Polygon Lasso.
• Magic Wand tool: Click the Magic Wand and click a bitmap to select contiguous areas of solid or similar colours in your image.
• Brush tool: Click this tool to paint on the canvas.
• Pencil tool: Click the Pencil tool and click and drag to draw single-pixel-width lines. If you want control over the thickness and texture of the line you are creating, use the Brush tool.
• Eraser tool: Click the Eraser tool to erase through any bitmap object on the canvas.
• Blur/Sharpen/Dodge/Burn/Smudge tool: Click this tool and click and drag on the canvas to soften the focus of (Blur) or bring into focus (Sharpen) an area of a bitmap image. Click the Dodge tool and click and drag on the canvas to lighten an area of a bitmap image. Click the Burn tool and click and drag to darken an area of a bitmap image. Click the Smudge tool and click and drag on the canvas to smear a part of an image into another part of the image, as if you were finger painting. You can set the parameters for these tools in the Property inspector.
Rubber Stamp/Replace Colour/Red Eye Removal tool: Click this tool to copy a selected area of a bitmap to another spot on the canvas. Alt+click the area that you want to copy, and then click and paint where you want the copy to go. Use the new Replace Colour tool to swap one colour for another wherever you click and drag the Replace Colour brush on the canvas. Simply click with the new Red Eye Removal tool to replace red with black wherever you click the canvas.
• Paint Bucket/Gradient tool: Click this tool and then click a shape on the canvas to fill the shape with a solid colour (Paint Bucket) or gradient.
• Eyedropper tool: Click this handy tool to select a colour from the swatches in the colour picker or from any object on the canvas by clicking the desired colour.
|
 |
Vector:
The following six tools make up the Vector section of the Tools panel:
• Line tool: With the Line tool, you can draw a straight line every time. You can adjust the line's thickness, color, and other parameters in the Property inspector.
• Pen/Vector Path/Redraw Path tool: Click the Pen tool to create vector graphics by drawing vector paths. You can use the Pen tool to select points and let Fireworks connect the dots, or you can draw the shape yourself with the Vector Path tool. You can use the Redraw Path tool to change the shape of a vector graphic by clicking and dragging any of the points that define the shape.
• Text tool: Click this tool and click the canvas to place and edit text on the canvas.
• Rectangle/Rounded Rectangle/Ellipse/Polygon tool: Create vector shapes by clicking these tools and clicking and dragging on the canvas.
• Knife tool: Click this tool and click and drag a line to cut vector paths in two.
• Freeform/Reshape Area/Path Scrubber (Additive)/Path Scrubber (Subtractive) tool: Use the Freeform tool to reshape a vector path by pushing or pulling the stroke instead of moving the individual points that define it. Use the Reshape Area tool to pull a vector path as if you had grabbed it with your hand. Use the Path Scrubber tool to change the color, thickness, and various other properties of the vector path. If you have a graphics tablet, you can set the properties to vary based on variations in the pressure or speed you use in drawing. |
 |
Web :
The following 4 tools are defining areas specific for the web
Hyperlinks: This you use to set a hyperlink if Fireworks is going to create your web page(don’t use it)
Slice tool: You use this tool to define an area that you want to be a separate image
Hide slices: You click this if you want to hide your slices while you work.
Show Slices: you click this if you want to show where you have defined slices. |
When creating files to put onto a web page you should save or export them as a gif or a jpeg but also save them in their native .png format so you can edit or reuse them later.
|


