Queries allow you to be selective about the information to be retrieved. For example, maybe we only want to see all the products in the Pop category that have a cost price less than .80.
Access has many types of queries you can run, but we will concentrate on the Select1 Query. The big advantage Access has is that you build queries through a graphical interface. Before when information was to be retrieved from the database, the user had to type in a big line SQL code to get the information. Access avoids this method by allowing you to basically "click and drag" the fields you want to report on. After you select all the field necessary for the query, Access builds the SQL in the background, sends it to the database and returns the result in a datasheet format.
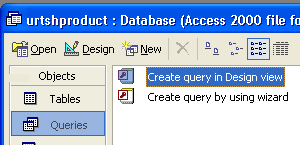
To create a new query, click the Query tab on the main window and click the New button.

The New Query window will appear:
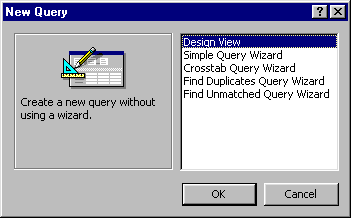
We are going to use the Design View. Click the Design View in the list and click the OK button.
Now that have pick the type of query we want, we have to select which tables are going to be a part of the query. The Show Table window should be showing:
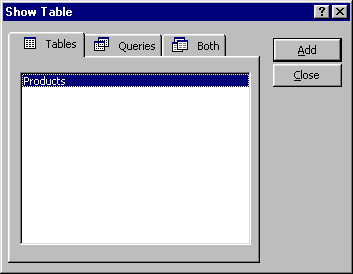
This screen lists the possible tables and queries (yup, you can base a query on a saved query) to select from to build the query. We only have the one table. Click the tblProducts name in the Table Tab area and click the Add button. This adds the table to the query. Click the Close button.
You should now see the tblProducts table in the Select Query window.
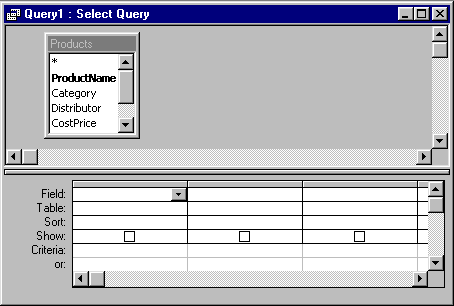
We now have to choose which fields we want in the query. There are two ways:
In the first blank column, click once in the Field row. If it now already showing, a small down arrow will appear by to the right of the white box. Click the down arrow. This will list the fields that can be selected.

Click ProductName in the list.
In the Select Query, you can see the Products table (let's call it the Product table box). In this box, it lists all the fields in the Product table that can be selected for the query. To select the field, click and hold the left mouse button on the Category field in the Product table box. While holding the mouse button down, drag the mouse on top of a blank column and release the mouse button.
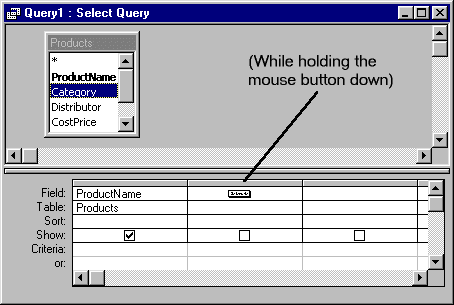
You should now have the ProductName and Category fields selected in the Field row of the two columns.
Even though we have not entered any
criteria (restrictions like only the Pop entries), we can execute
the query. To run the
query, click the Run ![]() button or select Query, Run from the menu.
button or select Query, Run from the menu.
The following screen should appear:
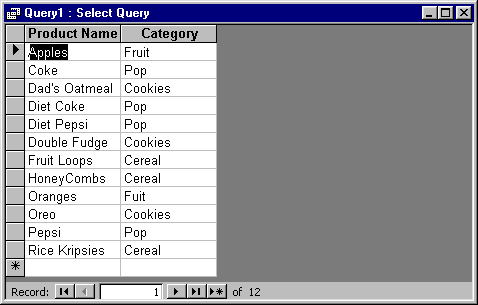
This is called a dynaset. It is a temporary table that is created and contains the values from your query. Be careful though as any changes performed to the data will be reflected back in the Products table. Why would you want to do a change then? For example, let's say we know we made a typing error on the ProductName for one of the products in the Pop category. We could write a query to look for just the Pop category and scan through the dynaset for the ProductName to correct. This would be much easier than looking through hundreds of entries in the main table.
To return to the Design
window, click the Design ![]() button or select View, Design View from the
menu.
button or select View, Design View from the
menu.
The results can be sorted in Ascending (A to Z) or Descending (Z to A) order.
To sort the ProductName in Ascending order, click the white Sort box in the ProductName column. A small down arrow will appear to the right of the box. Click the down arrow and select Ascending from the list.
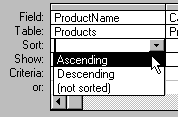
To remove the sorting, click the down arrow in the Sort box and select (not sorted).
By default, when you select a field to have in the query, it shows in the dynaset when the query is run. But, there may be an instance where you may want a field in your query but not to show up in the query. For example, let us say that someone wants a list of products that cost us more than $1 but they do not need to know the prices for the product (they just care about the products that are more than $1). In this case, you would include the ProductName and CostPrice, with CostPrice having a criteria of greater than one. If you click the Show box under the CostPrice column, this would prevent the price from being displayed in the dynaset, but you would only get the products that are more than one dollar showing because of the criteria entered for CostPrice.
Removing a field from the query
Sometimes you may have no need for a field you selected. To remove the Category field, use one of the following:
As mentioned previously, the main advantage that Access has is the graphical user interface for creating queries. The SQL code for the query is automatically generated in the background.
If you want to see the SQL code that is generated by the query, select View, SQL View from the menu. This will show you the SQL code. You can make modifications in this window if you know SQL. BUT, as soon as you make any changes, you can not go back to the Design View.
To return to the Design View, select View, Design View from the menu.
To save the query:

Type in "List of Products".
To close the query window, click the ![]() button or select File,
Close from the menu.
button or select File,
Close from the menu.